I’m genuinely excited to show you how to set up a writer’s notebook because it is an EXCELLENT resource for students, one that will give them a place to store their writings, one that will help them quickly find information they need.
Call it what you want–a writer’s notebook, a literacy notebook, an interactive notebook, a reader and writer’s notebook–and have your students set one up today. You’ll be glad you did! I promise!
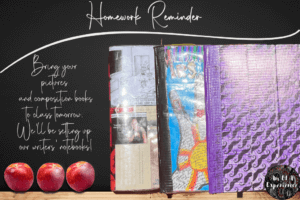
Supplies You’ll Need for Setting Up a Writer’s Notebook
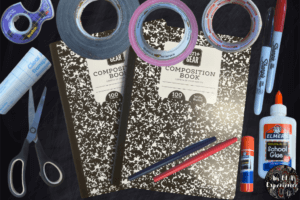
Let’s begin with supplies. (Don’t spend too much of your own money on these items. Instead, add some to your student supply list and ask your department head to purchase the rest.)
- 1-2 composition books for each student
If you’re teaching an hour and a half block, each student will need two; if you’re teaching a forty-five-minute period, they’ll only need one. Composition books are perfect for writers’ notebooks because the hardcovers are durable (unlike a folder or spiral) and the pages are ready to go (so students don’t need to add sheets of paper). Also, in August, you can find these at Walmart for fifty cents each. You can’t find a better deal! Make sure to buy one or two for yourself so you can model for your students and have one for your records.
- Picture of a favorite (e.g., person, pet, place, sport, etc.)
Ask students to bring in a picture of someone or something they love. They will tape it into their writers’ notebooks, and it can serve as their first writing prompt. It also adds a sense of value and ownership to their notebooks. (Plan to print a few pictures for those students who forget theirs.)
- Decorative duct tape
If you’re teaching a block period, students will tape two composition books together with duct tape. Each student will need a strip of tape that’s about as wide as his/her desk.
- Sticky tabs (if you want to label sections)
- Permanent markers (for writing names on notebooks and tabs)
- Scissors
- Tape or glue
- Packing tape or clear contact paper (to protect decorated covers)
- Pen
How to Set Up a Writer’s Notebook
Step One–Grab Their Attention with a Short Video with Ideas for a Writer’s Notebook
To show students what we will be doing with our writers’ notebooks, I begin the lesson by viewing and discussing a video from Ruth Ayres. (I’ve never met her, but I like her because she uses writers’ notebooks as I do.)
Step Two–Review Guidelines for Writers’ Notebooks
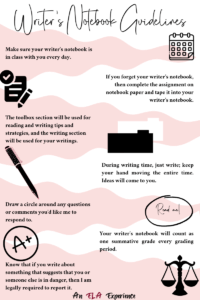
Decide on and review guidelines for writers’ notebooks with students, and have them tape these into the inside cover of the toolbox section. (As I’ve said before, students will do better work when they know what you expect.) Also consider using crates or bookshelves for writers’ notebook storage. By doing this, students will always have them in class.
Here’s an example of guidelines I’ve used.
Step Three–Write Names on Writers’ Notebooks

Next, have students write their names on the front of their notebooks and/or across the pages on the sides.
Step Four–How to Set Up a Writer’s Notebook with Tabs
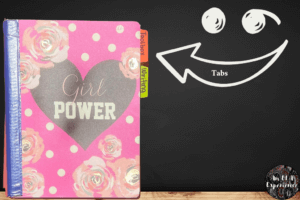
If you’re using tabs, instruct students to write toolbox on one and writing on the other and pass some permanent markers around the room for students to use. They’ll stick these to the first pages if they’re using two notebooks or to page numbers one and fifty if using one.
Step Five–Setting Up a Writer’s Notebook with a Table of Contents
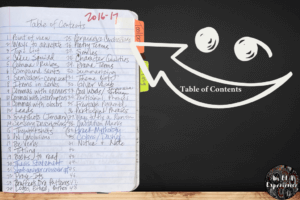
Use a document camera to model how to set up a table of contents for the toolbox section of the notebook. Title the first page of this section “Table of Contents.” Fold the paper in half (hotdog style), and number each line (from one to twenty-four for wide-ruled) inside the red margin. On the right side of the fold, continue numbering until you reach the last line.
There has been some debate on whether a table of contents should be expected of students. I do require students to keep a table of contents for the toolbox section of their writers’ notebooks, and I have a reason for this: Most middle students aren’t organized, so I want to teach them ways to organize. What good is a writer’s notebook if they can’t find the information they’re looking for? By keeping a table of contents, students can quickly scan for a particular resource and then turn directly to the page instead of flipping through page after page after page. As for the writing section, students may keep a table of contents if they want to, but I don’t require it. Since we’re usually revising or editing the last entry they wrote, those pages can be found easily.
Step Six–Number Pages in Writers’ Notebooks
Again, in the toolbox section, number your pages (from one to fifty for now) on the front sides only. (The back sides can be left blank.)
Step Seven–Give Students Time to Set Up Their Writers’ Notebooks

While students are adding tabs, creating tables of contents, and numbering pages, walk around the room with duct tape and help them tape their composition books together (or assist them as needed). (If you are taping two books together, ask a couple of students to help with this step so that you can finish before the bell rings. They can give students strips of duct tape or help them tape books together too.)
Begin by taping the spines together. Next, tape the back and front covers tightly side by side on the bottom and the side so that you leave a pocket at the top. (Students can keep their pens or bathroom passes in the pocket.)
Step Eight–Write in Writers’ Notebooks
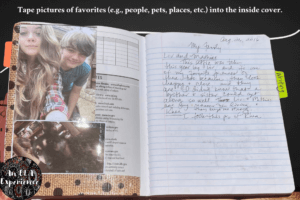
After students’ composition books are set up, direct them to tape the pictures of their favorites onto the first page or the inside cover in the writing section. You can now enjoy around ten minutes of writing-time silence while they write about the picture (e.g., who or what is pictured, what’s happening, why it’s important).
Allow students to share their writings with partners or ask for volunteers to read theirs to the class. Build community by closing with a quick discussion on experiences they noticed that were similar between writers.
Step Nine–How to Decorate a Writer’s Notebook
Introduce students to three (or a number you feel comfortable with) of these activities and allow them to choose the one they’d like to use as a cover for their writers’ notebooks.
Make sure they include their name on the front and consider covering their notebooks with packing tape or clear contact paper to protect them.
Here are seven ways they can decorate the outside of their notebooks:
Name in Triangles
Cut a sheet of paper so that it’s the size of the composition book. Create triangles by drawing lines from one side of the paper to the other. Write your name in each of the triangles, filling up the entire space. Outline and color with markers.
Subject-Related Memes and Quotes
Google and print English memes and/or quotes. Cut and paste them onto the cover of your writers’ notebooks.
Illustrated Hands
Trace your hand onto a sheet of paper cut to the size of your writer’s notebook. Use markers to decorate with words and illustrations.
3D Hands
One year, I came across this 3D hand-drawing video, and the students had fun with it. Trace your hand onto a sheet of paper the size of your composition book and then draw lines across the page adding a lump each time your pencil touches the outline of the hand.
Duct Tape
Cover notebooks with duct tape.
6-Word Memoirs (a Lesson for the Writer’s Notebook)
Have students summarize their lives in six words on paper or a computer with an image and glue it to the front of their notebooks. My most recent one says, “Rebellious teenager transformed into conservative teacher.” 😯 You can use this video to inspire students to write their own.
This memoir would also be a great introduction to personal narrative writing. (Find more activities for this genre by reading my second blog post.)
Words from Magazines
Clip headlines from magazines, arrange and tape them onto the composition book’s cover. (See your librarian for magazines.)
Related Links on How to Set Up a Writer’s Notebook
How to Create and Use a Writer’s Notebook (Adults)
Why and How: Writing Journals for Students (Secondary)
How to Set Up a Writer’s Notebook: Tips for Success in the Classroom (Middle School)
Setting Up Our Writers’ Notebooks (Grade 3)
Writers’ notebooks are excellent resources for students. They’re great for organizing notes, ideas, and important information that will come in handy. They’re also useful for planning, writing, revising, and editing the various papers students will write during the school year. I hope you show your students how to set up a writer’s notebook this week and let me know what you’re up to!


One Response